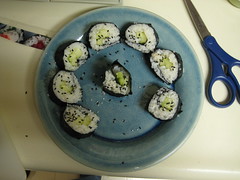
On Christmas Day night we were feeling lethargic and bloated and we knew we needed healthy vegetables and rice for dinner. I mustered the strength to try making something I'd only ever eaten in restaurants before.
A couple weeks ago I'd bought some nori, the dried seaweed sheets used in Japanese cuisine. I'd been wanting to make maki, the rolls with rice and, for me, veggies, but for some others, fish or crab, like California rolls. Kapa maki is the basic cucumber roll.
From several different web sources plus my own experience in eating maki, I pieced together a how-to.
First I made the rice. I made the smallest amount my rice cooker allows, which is 4 cups prepared. Once the rice is cooked, spread it on a rimmed baking sheet so it will cool evenly. Sprinkle some rice vinegar and toss--doing this while it's still warm will help reduce clumping. You want it sticky, but not totally clumped together.
While the rice cools, slice the cucumber or other fillings you plan on rolling. I did cucumbers and red peppers. You want long, thin slices. Peel the cucumbers, quarter them lengthwise, and slice out the seeds. Then slice them lengthwise again into 4 or 5 strips.
This is where I started following the directions on the nori package. Lay a piece of nori, shiny side down, on your sushi mat. Place one cup of the prepared rice on the nori, spreading it evenly over the two-thirds of the nori that is closest to you. Keep a bowl of water handy to wet your fingertips while you're working to make it easier to handle the rice. Make an indentation in the middle of the rice, along the thirds line. Place 3 or 4 strips of cucumber in the indentation.
Start rolling. Use the mat to apply even pressure as you're rolling. As you roll, tuck the bottom edge of the nori in behind the cucumber, then keep rolling with medium pressure. Moisten your fingertips to close and secure the top edge of the nori to the roll.
Place on a cutting board and slice evenly, wetting the knife every couple of slices to keep the rice from sticking to it.
Four cups of rice yielded 4 maki. We made 3 with cucumber and one with red peppers. We added a dash of water to powdered wasabi. (This wasabi was much stronger than we've had in restaurants!)
Maki turned out to be so easy, we can't believe we hadn't tried it before! I can add all sorts of fruits and vegetables for the filling. It would be great appetizers for a party. And it's so good for you! Rice and veggies, that's basically it.

28 December 2007
15 December 2007
diablo oriental foods
Why oh why did I wait so long to check out Diablo Oriental Foods? It's right around the corner from my home and all the times I mused about making my own maki... I could have made my dreams come true so easily.
This is a small market. The selection isn't stellar, but what they do have is some very specific Japanese food ingredients that you'll be hard-pressed to find elsewhere. They have a small selection of Asian vegetables, some of which I'd never seen before. They also have some fresh meats and fish. The prices are decent. Some of the jars of stuff seemed pricey and that could have to do with weight and importing. But my needs were few and I shopped smartly so for $11 I bought a mini-steamer for veggies in the microwave, a bag of chunky sea salt for my salt grinder, a shaker of furikake (both the furiakake and sea salt are probably large enough to last for 6 months, since they aren't things we use every day), and a pack of nori with 10 large sheets. They have a small selection of houseware, including some bento supplies, but that's some of the stuff that seemed more expensive.
I could have gone crazy buying quite a bit more. But I walked there, plus until we know exactly when we're moving and what our packing strategy will be we're trying to curb purchases.
Since it's not easy for me to get to Ichiban Kan or Daiso, Diablo Oriental Foods will have to satisfy my craving for the time being. It's not the same, but it's a taste.
12 December 2007
what i eat in africa
What I eat in Africa is something I'll be discovering very soon. In case you haven't heard, Mike's job is transferring us to Bujumbura, Burundi, in East Africa next year.
When going through the medical clearance process, no one questioned my celiac disease. And I was ready to defend it. I knew that wheat is not a major staple in most of the countries we could possibly be sent to. Since we're allowed to bring a couple thousand pounds' worth of our own pantry items from home, I knew I'd just bring Bob's Red Mill instead of Duncan Hines. I was keeping my fingers crossed for a place with lots of fresh fruits and veggies.
And I think I hit the jackpot. From eDiplomats.com:
This is all excellent news! We've also heard that rice, peanuts, and Indian and other Asian spices are available and inexpensive. Our eating habits won't have to adjust that much, except for trying all the new dishes. And the lack of dairy--there's apparently very little in the way of good fresh milk. That will probably be the biggest culinary problem for us. (The parts I left out with the ... pertain to how what little processed food is available is expensive because it's all imported from Europe.)
I don't consider myself an adventurous eater, I just like fresh food instead of processed. Many of our peers look at this information and cringe about how they'll have to bring all their cans of Progresso soup from home. I say, "Hopefully it won't be that much different than going to farmers' market here."
When going through the medical clearance process, no one questioned my celiac disease. And I was ready to defend it. I knew that wheat is not a major staple in most of the countries we could possibly be sent to. Since we're allowed to bring a couple thousand pounds' worth of our own pantry items from home, I knew I'd just bring Bob's Red Mill instead of Duncan Hines. I was keeping my fingers crossed for a place with lots of fresh fruits and veggies.
And I think I hit the jackpot. From eDiplomats.com:
Fresh tropical fruits, such as bananas, a papayas, mangoes, pineapples, Japanese plums, citrus, avocados, and strawberries are available and inexpensive. Vegetables, including cucumbers, green beans, dried beans and lentils, green peas, cabbage, tomatoes, artichokes, carrots, cauliflower, beets, lettuce, potatoes, turnips, onions, green onions, leeks, and green peppers are also inexpensively available. Fresh spices are also found, including thyme, oregano, basil, rosemary, sage, cilantro, fennel and parsley.... There are many local butcheries, which supply good quality beef, pork, lamb, goat, and poultry. Turkeys are raised in a nearby Italian Mission. A variety of sausages and coldcuts are made locally.... Burundi coffee and tea are excellent and inexpensive.
This is all excellent news! We've also heard that rice, peanuts, and Indian and other Asian spices are available and inexpensive. Our eating habits won't have to adjust that much, except for trying all the new dishes. And the lack of dairy--there's apparently very little in the way of good fresh milk. That will probably be the biggest culinary problem for us. (The parts I left out with the ... pertain to how what little processed food is available is expensive because it's all imported from Europe.)
I don't consider myself an adventurous eater, I just like fresh food instead of processed. Many of our peers look at this information and cringe about how they'll have to bring all their cans of Progresso soup from home. I say, "Hopefully it won't be that much different than going to farmers' market here."
08 December 2007
chiles rellenos
What do I do when Planet Organics drops four unexpected poblano (or pasilla) chiles on my doorstep because I wasn't paying careful enough attention to my produce order?
Chiles rellenos! I'd never had this at a restaurant because of the breading. But Mike loves these cheesy chiles, especially from one particular place that was our favorite Mexican restaurant in San Diego. So I set about figuring out a way to make them at home with my beautiful accidental poblanos. Between online searches and rifling through cookbooks I couldn't find anything that jived with Mike's memory of the specific chiles rellenos. But I figured out the basic idea and I used Joy of Cooking as my main guideline.
First I roasted the peppers. To roast in the oven, place them on a baking sheet and broil for a few minutes, turning two or three times for evenness. Make sure you use tongs for turning them; a fork might pierce the skin. They're done when the skin starts to blister and turn black. Once they're cool enough to handle, peel off the skins.
Then I came to my first impasse. How do I get the cheese in and the veins and seeds out? I wanted to bread them, which makes it difficult to make a long, lengthwise slice. None of the recipes I found made the chiles exactly the way I wanted them, so I had to wing this part. I made two slices near the stem, forming a T. I was able to get my paring knife into the T and with a little careful wriggling I cut out the bulk of the seeds near the base of the stem and most of the veins. After that, shoving in the cheese was a cinch.
I grated some Monterey Jack cheese to stuff the peppers. I also threw in some kidney beans. I couldn't come up with a good side dish, making the chiles rellenos the only course, so I wanted them to be slightly healthier than breaded cheese. Beans make a good filling because they are nonfat yet high in fiber and protein.
Phew. Next step, breading. Usually I recruit Mike for this job but being my first stab at chiles rellenos I wanted to have my hands on every step. It was surprisingly easy to handle the stuffed peppers. They are sturdy yet pliable. Dipping them in potato starch then in egg made a nice sticky paste that sealed the slices together quite nicely.
For bread crumbs I used Southern Homestyle Tortilla Crumbs. I had never even heard of tortilla crumbs, yet lo and behold, I found a new grocery store recently and they sold tortilla crumbs. Theoretically, you'd think they'd be the perfect breading for chiles rellenos.
I baked my breaded chiles in the oven at 350 degrees for 15 minutes. Since they're already roasted, they're soft enough to eat. You just need to get the cheese all warm and melty.
And boy were these warm and melty! The taste wasn't perfect and Mike and I have a few ideas for improvement. But lots of melted cheese heals all ills. (Except lactose intolerance I guess.) We deemed these chiles pretty good for a first effort. The breading wasn't quite as thick and crispy as we both like. Mike's the breading genius so I'll let him do it next time. And more flavor was needed in the stuffing. I'm thinking either garlic or green onions next time. Poblano chiles are mild, so if you want a little kick you need to add it. Maybe a bit of chopped serrano?
07 December 2007
chili-roasted acorn squash
I got this from Everyday Food.
I also made plain quinoa to serve the squash on. Something was not quite right about this meal. It was warm and filling but the taste was off. Maybe it was a sub-par squash. Maybe just because Martha says it's okay to eat the skin of an acorn squash that doesn't necessarily mean that you should. Maybe it needed a bit more salt and pepper. Whatever the case, last night was cold and rainy and we gobbled up this warm, comforting dish.
2 acorn squash (1 1/2 pounds each), halved lengthwise, seeds removed
2 tablespoons olive oil
2 teaspoons chili powder
Coarse salt and ground pepper
1. Preheat oven to 450 degrees. Cut each squash half into several wedges, then halve wedges crosswise.
2. On a large rimmed baking sheet, toss squash with oil and chili powder; season with salt and pepper, and toss again. Roast until tender and starting to brown, 20 to 25 minutes, tossing halfway through. (This is the full recipe for 4; I halved it.)
I also made plain quinoa to serve the squash on. Something was not quite right about this meal. It was warm and filling but the taste was off. Maybe it was a sub-par squash. Maybe just because Martha says it's okay to eat the skin of an acorn squash that doesn't necessarily mean that you should. Maybe it needed a bit more salt and pepper. Whatever the case, last night was cold and rainy and we gobbled up this warm, comforting dish.
stuffed grape leaves (dolma)
 Stuffed grape leaves are one of those foods I never got around to trying until recently when Mike and I were starving for a quick dinner, came across a Mediterranean cafe, and it was the only menu item that appeared to be gluten-free. I was hooked. And according to Mike, who eats them all the time, the ones at that restaurant weren't even very good.
Where do I go to figure out these ingredients and make stuffed grape leaves on my own? What's in the stuffing? Where do I get grape leaves? First stop, Moosewood. Mollie Katzen has a recipe for a rice pilaf that she uses for stuffing grape leaves, artichokes, and eggplant. (It's also great on its own.) You can buy grape leaves in a jar (I found them at both Whole Foods and Safeway).
Mollie Katzen's Greek Pilaf
1 1/2 cups raw brown rice (long- or short-grained)
2 1/4 cups water
1 to 2 Tbs olive oil
1 1/2 cups mince onion
1 small stalk celery, minced
1/2 tsp salt
1/2 cup lightly toasted sunflower seeds or pine nuts
black pepper, to taste
4 to 5 medium cloves garlic, minced
2 Tbs lemon juice
1/4 cup freshly minced parsley
1 Tbs dried mint (or 3 Tbs fresh, minced)
1. Place rice and water in a small saucepan. Bring to a boil, cover, and simmer until tender (about 40 minutes).
2. Meanwhile, heat the olive oil in a small skillet. Add onion, celery, and salt, and saute until the vegetables are tender (5 to 8 minutes). Add sunflower seeds or pine nuts, black pepper, and garlic. Saute for 5 minutes.
3. Stir the sauteed mixture into the cooked rice along with lemon juice and herbs. Mix well.
This rice pilaf is so totally delicious on its own, it's hard not to eat it before you've rolled it all up into the grape leaves. We aren't huge onion fans, so I use about half of what the recipe calls for. Also, Mike has an irrational hatred of celery so I leave it out entirely. I've used pine nuts and haven't tried sunflower seeds yet. I always add salt and pepper to taste at the end when I mix in the herbs rather than saute it with the onion mixture.
 I've had trouble with rolling the leaves, but Mike figured it out quickly, so I like to put him to work doing this. Lay out a leaf on your work surface. The leaves should be between 3 and 4 inches wide. Place a spoonful of rice pilaf near the stem end. Fold in the side and roll toward the tip. You can heat these up in the oven for about 20 minutes to warm through (the way I like them) or eat them cold and slimy (the way Mike likes them). I mix a little plain yogurt* with lemon juice for dipping. You can also make a quick tahini-lemon dip that's also tasty with them.
These are also great to make ahead and keep in the fridge for a few days. For storage I drizzled a little olive oil over them to keep them moist.
*For vegan or dairy-free, omit the yogurt sauce.
02 December 2007
crave bakery monster cookie
 Have you ever bitten into a fresh cookie at a bakery and thought "Okay, I can die happy now." The Monster Cookie from Crave Bakery made me feel that way. And it came from a package in a freezer.
 This cookie has the ridiculously rich sweetness of raw cookie dough. The cookie and the chocolate chips melt in your mouth. There's an unexpected warm apple-cinnamon feeling. I never wanted this cookie to end.
About half-way through the cookie I had to stop and take a breather. It was just too good. During that rest I looked up Crave Bakery's website to see if they have a storefront where I can buy cookies fresh in San Francisco. It appears that they don't, unfortunately.
If you live in California, Washington, Oregon, and Nevada you can buy them in select stores. Crave also sells the cookies in bulk from their website. They are shelf-stable for 7 days or can be frozen for longer. I bought mine frozen at Whole Foods. After about 90 minutes on the counter at room temperature it was perfectly ready to eat. I bet if you zapped it in the microwave for a few seconds it would be not only gooey but pleasingly warm.
Crave offers the monster cookie, a brownie cookie, a chocolate cake and a pumpkin tart. All products are gluten-free and casein-free. The individual packaging of each cookie makes them great for travel snacks. (I was going to say kids' lunches, but in retrospect I think it's too sweet for a kid to eat the whole thing in one sitting.)
I'll be looking for the brownie on my next grocery shopping trip. If it has all the goodness of the cookie, but with chocolate... I can't even complete that thought.
(Logo image from the Crave website.)
01 December 2007
grindstone bakery
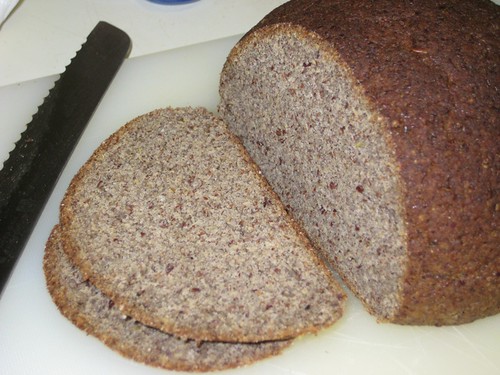
When I heard about Grindstone Bakery's fresh-baked gluten-free bread I thought it was too good to be true. It seems impossible to find gf bread that isn't frozen, vacuum-sealed, or both, to ensure "freshness." I decided to pay the price ($10) to find out how it would be.
It wasn't exactly warm from the oven, but it was a fresh loaf. The first thing I thought was, "Whoa. Heavy." It's as heavy and nearly as dense as a brick. It certainly is a hearty bread. It's not a nice, soft, "bready" loaf. (I don't know about anyone else, but I miss a good, soft bready bread.) But the taste is pretty good. For the first day or two it was moist enough to eat without toasting. It does make a very tasty slice of toast though, especially when sliced thick so the outside gets crispy and the inside gets warm and soft. Eat it fast though. In less than a week it looks like this:
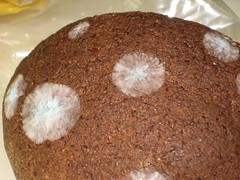
One of the ingredients listed is raisin juice. Huh? Isn't a raisin a raisin because it lacks juice? Whatever it is, it seems to be what gives this bread a moist chewiness, almost stickiness. And as you can see from the photos, it's an attractive loaf of bread, even when moldy. This would be a good bread to serve with a hearty winter meal. A toasted slice next to a bowl of soup could be an entire meal, actually. This bread is filling.
I ordered mine through Planet Organics. You can order directly from Grindstone Bakery and if you live in the San Francisco area you can buy their loaves at some local stores. They have a variety of whole grain wheat-free and gluten-free artisan loaves. The gluten-free loaves are made in a separate facility with a grinding wheel that is only used for gluten-free grains. All of their breads are also yeast- and dairy-free.
Subscribe to:
Posts (Atom)